RSS
Showing posts with label Installation Techniques. Show all posts

Cork Underlayment For Hardwood Floors

We're often asked; can cork underlayment work to reduce noise from the upstairs floors before we install new solid hardwood? Or... can I use the standard roll stuff that comes in 1/4" thickness?

The answer lies in a few questions asked first. In the case of the example above we're dealing with a standard 3/4" plywood subfloor where the new hardwood will be nailed or stapled. If you're seeking to eliminate squeaks that are now heard under the carpeting cork is not the answer. But once some repairs are made to the squeaky areas cork will definatly muffle or quiet and sometimes eliminate foot traffic sounds. It is not exact as other factors come into play.

Image Credit

For instance. If the subfloor is uneven, boards will have a tendency to rub against one another, or up and down. Cork underlayment will suppress the noise but it will be heard when walking on that upstairs flooring area. For the underlayment to work effectively one needs a flat subfloor substrate to work with.

Okay. But You're Adding 1/4 of an Inch Under The New Hardwood. Will the Fasteners Hold?

This one is up for debate. Considering a standard flooring staple or nail used for plywood over floor joists systems is two inches in length and penetrates 3/4" plywood by approximately 3/8 of an inch, you're not really losing anything. On the other hand, if you're nailing through the plywood into the joist system (which I rarely see being done) you do lose some of the grabbing power of the joist system.

All are welcome for debate!

  • Digg
  • Del.icio.us
  • StumbleUpon
  • Reddit
  • RSS

Cork Underlayment For Hardwood Floors

We're often asked; can cork underlayment work to reduce noise from the upstairs floors before we install new solid hardwood? Or... can I use the standard roll stuff that comes in 1/4" thickness?

The answer lies in a few questions asked first. In the case of the example above we're dealing with a standard 3/4" plywood subfloor where the new hardwood will be nailed or stapled. If you're seeking to eliminate squeaks that are now heard under the carpeting cork is not the answer. But once some repairs are made to the squeaky areas cork will definatly muffle or quiet and sometimes eliminate foot traffic sounds. It is not exact as other factors come into play.

Image Credit

For instance. If the subfloor is uneven, boards will have a tendency to rub against one another, or up and down. Cork underlayment will suppress the noise but it will be heard when walking on that upstairs flooring area. For the underlayment to work effectively one needs a flat subfloor substrate to work with.

Okay. But You're Adding 1/4 of an Inch Under The New Hardwood. Will the Fasteners Hold?

This one is up for debate. Considering a standard flooring staple or nail used for plywood over floor joists systems is two inches in length and penetrates 3/4" plywood by approximately 3/8 of an inch, you're not really losing anything. On the other hand, if you're nailing through the plywood into the joist system (which I rarely see being done) you do lose some of the grabbing power of the joist system.

All are welcome for debate!

  • Digg
  • Del.icio.us
  • StumbleUpon
  • Reddit
  • RSS

Clamps For Floating Hardwood Floors?

I noticed a discussion over at Finehomebuilding.com that's been going on for a few weeks now. The poster had been having problems with a glue together floating floor; namely with the floor making all sorts of noises after it was installed. Temporary creaking with glued floating floors is common as the floor needs to find it's "equilibrium point" after the installation

But the questions among many became is clamping a floating floor necessary? Let's go back to the original types manufactured by Kahrs, and Harris-Tarkett. These floors were always milled with such precision that once the glue is applied and the boards tapped into place there wasn't any seperation unless you had a heard of elephants running across it. Once engaged it was tight as a drum, because they were designed this way.

Today many manufacturers give the green light to floating floors that they never advised of before. The products did not change in their construction whatsoever. It became more of a matter of "let's keep up with the do it yourself trend before we're left in the dust." Floating hardwood floors had become the mainstay of an easier hardwood installation.

In any event (I don't have all the exact product line names) suddenly a few dozen brand lines manufactured by Armstrong( Bruce, Hartco, Robbins) were considered okay for a floating type installation. Many in the installation industry were left scratching their heads.

To The Story...Are Clamps Needed?

For thinner engineered floors or those that fit loosely before glue is applied clamping would be beneficial for two reasons.
  • Keeps the floor tight before the glue dries.
  • Keeps bowed pieces tight and eliminates or cuts down on gapping before glue dries.
Other reasons clamping may be necessary include the makeup of the material being used. Back in the beginning with Kahrs and Tarkett, their products were long and wide or on the order of eight feet long and 7 or 8 inches wide. Coined longstrip. Nowadays it ain't like that at all. Many of the Armstrong lines would need 5,6, or seven pieces to makeup the orginal longstrip hardwood.

In essence if you were working side by side with one installing the Longstrip and the other a common Armstrong hardwood, you'd be installing more boards. Chances of boards gapping are greater.

  • Digg
  • Del.icio.us
  • StumbleUpon
  • Reddit
  • RSS

Clamps For Floating Hardwood Floors?

I noticed a discussion over at Finehomebuilding.com that's been going on for a few weeks now. The poster had been having problems with a glue together floating floor; namely with the floor making all sorts of noises after it was installed. Temporary creaking with glued floating floors is common as the floor needs to find it's "equilibrium point" after the installation

But the questions among many became is clamping a floating floor necessary? Let's go back to the original types manufactured by Kahrs, and Harris-Tarkett. These floors were always milled with such precision that once the glue is applied and the boards tapped into place there wasn't any seperation unless you had a heard of elephants running across it. Once engaged it was tight as a drum, because they were designed this way.

Today many manufacturers give the green light to floating floors that they never advised of before. The products did not change in their construction whatsoever. It became more of a matter of "let's keep up with the do it yourself trend before we're left in the dust." Floating hardwood floors had become the mainstay of an easier hardwood installation.

In any event (I don't have all the exact product line names) suddenly a few dozen brand lines manufactured by Armstrong( Bruce, Hartco, Robbins) were considered okay for a floating type installation. Many in the installation industry were left scratching their heads.

To The Story...Are Clamps Needed?

For thinner engineered floors or those that fit loosely before glue is applied clamping would be beneficial for two reasons.
  • Keeps the floor tight before the glue dries.
  • Keeps bowed pieces tight and eliminates or cuts down on gapping before glue dries.
Other reasons clamping may be necessary include the makeup of the material being used. Back in the beginning with Kahrs and Tarkett, their products were long and wide or on the order of eight feet long and 7 or 8 inches wide. Coined longstrip. Nowadays it ain't like that at all. Many of the Armstrong lines would need 5,6, or seven pieces to makeup the orginal longstrip hardwood.

In essence if you were working side by side with one installing the Longstrip and the other a common Armstrong hardwood, you'd be installing more boards. Chances of boards gapping are greater.

  • Digg
  • Del.icio.us
  • StumbleUpon
  • Reddit
  • RSS

Hardwood Flooring Installation Tips & Tricks

wood floor control lineLooking through some pictures on an older laptop dating back to 2003 I discovered some interesting ones that a story can be built around. Above is a glue down installation that ran into several rooms. In the background you can see the completed areas. At this juncture the installation dealt with following two parallel wall lines.

The furthest wall was straight forward in so far as how to deal with the last row that would be smaller than the three inch wide plank being used. Considering this is a gluedown installation the object is trying to stay off most of the area after the glue is spread. This prevents unnecessary board movement and keeps things tighter with minimal gapping.

In dealing with glued installations it's always wise to keep the areas from the wall as small as possible. In other words; keep it small so you aren't walking all over it. The area completed had been left to cure overnight. Hence there would be no board movement when working on top of it to finish off the area.

By using a control line I know where the installation "should be" once I place more and more boards on the floor. By measuring back in full three inch boards increments from the line I now have the dimensions for the pieces that will fall against wall #2. The below photo shows "fill in pieces" that will be needed along wall #2. Rather than struggling and standing on boards in the laid adhesive for the measurement I've found it ahead of time and made the necessary cuts on a table saw.

hardwood floor glue spread with trowel
I would not suggest trying an area as challenging as this for someone just learning or doing the job on a weekend. In effect you'd probably only want to work an area about nine inches or three boards off wall #2. I've been accustomed to handling these kind of installations and know my limits.
Shown below are two neat tricks in keeping glued floors tight before the adhesive dries. The first wedging trick shows scrap pieces against the baseboard. The second takes a bit more effort by using concrete nails and getting the floor tight by tapping the cut wedges with a hammer.

boards wedged against baseboard

flooring wedges nailed

  • Digg
  • Del.icio.us
  • StumbleUpon
  • Reddit
  • RSS

Hardwood Flooring Installation Tips & Tricks

west elm furniture,interior design, furnitures, office interiorswood floor control lineLooking through some pictures on an older laptop dating back to 2003 I discovered some interesting ones that a story can be built around. Above is a glue down installation that ran into several rooms. In the background you can see the completed areas. At this juncture the installation dealt with following two parallel wall lines.

The furthest wall was straight forward in so far as how to deal with the last row that would be smaller than the three inch wide plank being used. Considering this is a gluedown installation the object is trying to stay off most of the area after the glue is spread. This prevents unnecessary board movement and keeps things tighter with minimal gapping.

In dealing with glued installations it's always wise to keep the areas from the wall as small as possible. In other words; keep it small so you aren't walking all over it. The area completed had been left to cure overnight. Hence there would be no board movement when working on top of it to finish off the area.

By using a control line I know where the installation "should be" once I place more and more boards on the floor. By measuring back in full three inch boards increments from the line I now have the dimensions for the pieces that will fall against wall #2. The below photo shows "fill in pieces" that will be needed along wall #2. Rather than struggling and standing on boards in the laid adhesive for the measurement I've found it ahead of time and made the necessary cuts on a table saw.

west elm furniture,interior design, furnitures, office interiorshardwood floor glue spread with trowel
I would not suggest trying an area as challenging as this for someone just learning or doing the job on a weekend. In effect you'd probably only want to work an area about nine inches or three boards off wall #2. I've been accustomed to handling these kind of installations and know my limits.
Shown below are two neat tricks in keeping glued floors tight before the adhesive dries. The first wedging trick shows scrap pieces against the baseboard. The second takes a bit more effort by using concrete nails and getting the floor tight by tapping the cut wedges with a hammer.

west elm furniture,interior design, furnitures, office interiorsboards wedged against baseboard

west elm furniture,interior design, furnitures, office interiorsflooring wedges nailed

  • Digg
  • Del.icio.us
  • StumbleUpon
  • Reddit
  • RSS

Baseboard On Or Off Hardwood Floors?

Often the little things aren't discussed during a sales presentation when hardwood floors are purchased. For the most part if you're remodeling with new floors, many choose to replace the baseboard with something more in tune with the times; specifically taller base. A throwback to the days when more substantial trim was used in residential construction and not the el cheapo clam shell or colonial style baseboard that only rises three inches from the floor.

What to Expect When Removing The Baseboard?

Cheaper thin baseboard will likely break into pieces no matter how careful one can be, most notably ones that were finger joint manufactured. How to find out what type you have? By looking closely at the profile you're likely to make out the manufacturing method.

Leave The Baseboard Alone

Some are inclined to think..."why not leave it alone and let the wood installers just fit up to it?" Nearly all hardwood floors will need some kind of expansion space which in this case will require the need to install shoe molding or quarter round.

Our preference has always been shoe molding especially if the existing baseboard has a low profile. Example on the left shows 3/4" quarter round overwhelming the colonial style baseboard.

Other thoughts to consider; Don't be surprised if the perimeter of the floor is not flat once you install the base after the floor is completed. Perhaps you don't like the appearance of any trim on the baseboard.

Chances may be good once the base is being installed humps and valleys are seen under the base, or gapping. For larger gapping the only recourse is either to install base or shoe or have the one doing the work "scribe to fit the base" to the undulations in the subfloor.

  • Digg
  • Del.icio.us
  • StumbleUpon
  • Reddit
  • RSS

Baseboard On Or Off Hardwood Floors?

west elm furniture,interior design, furnitures, office interiors Often the little things aren't discussed during a sales presentation when hardwood floors are purchased. For the most part if you're remodeling with new floors, many choose to replace the baseboard with something more in tune with the times; specifically taller base. A throwback to the days when more substantial trim was used in residential construction and not the el cheapo clam shell or colonial style baseboard that only rises three inches from the floor.

What to Expect When Removing The Baseboard?

Cheaper thin baseboard will likely break into pieces no matter how careful one can be, most notably ones that were finger joint manufactured. How to find out what type you have? By looking closely at the profile you're likely to make out the manufacturing method.

Leave The Baseboard Alone

west elm furniture,interior design, furnitures, office interiorsSome are inclined to think..."why not leave it alone and let the wood installers just fit up to it?" Nearly all hardwood floors will need some kind of expansion space which in this case will require the need to install shoe molding or quarter round.

Our preference has always been shoe molding especially if the existing baseboard has a low profile. Example on the left shows 3/4" quarter round overwhelming the colonial style baseboard.

Other thoughts to consider; Don't be surprised if the perimeter of the floor is not flat once you install the base after the floor is completed. Perhaps you don't like the appearance of any trim on the baseboard.

Chances may be good once the base is being installed humps and valleys are seen under the base, or gapping. For larger gapping the only recourse is either to install base or shoe or have the one doing the work "scribe to fit the base" to the undulations in the subfloor.

  • Digg
  • Del.icio.us
  • StumbleUpon
  • Reddit
  • RSS

Easy Hardwood Floor Installations

locking hardwood floorsHow far can it go? Do it yourself hardwood floor installations are really becoming a no-brainer. At least the actual installation part of it. Take locking hardwood floors for example, the latest rage. It's almost as simple as laying the stuff on the floor and it practically connects itself...at least the better products like the ones Mirage makes.

What's next? We've come from the floating floors that are glued together to the so called click together floors and now locking...no glue, no nails...no clicking.

I remember about 15 years ago Robbins had a product that made the installation of the skinny 2- 1/4" strip flooring faster. Two boards were attached to one another similar to a longstrip type looking floor. The benefits were installing the floor twice as fast. Instead of nailing every 2- 1/4" wide board you were effectively nailing a 4- 1/2" wide board. Big time saver, but it didn't last. I don't know what happened to the concept.

Big difference from nailing those skinny strip floors. Though I've never had the privilege, 1- 1/2 " wide strip floors were popular at one time. Imagine hand nailing those floors!


There are some guys in North Carolina that have an interesting idea with solid unfinished flooring. Considering it does take quite a bit of time to start and end an installation when you get near walls they came up with an idea of three boards connected to one another, cutting the labor time drastically.

So now that they have this product, how about one large flooring square that can be dropped into place? Maybe something like four foot by four foot squares? Possibly, but I could foresee some transportation or handling problems, not to mention trying to cut the stuff. This would really get the job done quickly and easily. Four by four? 16 square feet at a time.!

Why not, there's carpet that can be installed in a similar fashion. On the right are carpet tiles offered by Lowes. Could it be a matter of time we may see something similar with hardwood flooring?


Puzzle Floor is interesting, but how many are clamoring to the idea? If it wasn't a gluedown only type of installation I could see more popularity with the do it yourself market. More on Puzzle Floor.

  • Digg
  • Del.icio.us
  • StumbleUpon
  • Reddit
  • RSS

Easy Hardwood Floor Installations

west elm furniture,interior design, furnitures, office interiorslocking hardwood floorsHow far can it go? Do it yourself hardwood floor installations are really becoming a no-brainer. At least the actual installation part of it. Take locking hardwood floors for example, the latest rage. It's almost as simple as laying the stuff on the floor and it practically connects itself...at least the better products like the ones Mirage makes.

What's next? We've come from the floating floors that are glued together to the so called click together floors and now locking...no glue, no nails...no clicking.

I remember about 15 years ago Robbins had a product that made the installation of the skinny 2- 1/4" strip flooring faster. Two boards were attached to one another similar to a longstrip type looking floor. The benefits were installing the floor twice as fast. Instead of nailing every 2- 1/4" wide board you were effectively nailing a 4- 1/2" wide board. Big time saver, but it didn't last. I don't know what happened to the concept.

Big difference from nailing those skinny strip floors. Though I've never had the privilege, 1- 1/2 " wide strip floors were popular at one time. Imagine hand nailing those floors!


There are some guys in North Carolina that have an interesting idea with solid unfinished flooring. Considering it does take quite a bit of time to start and end an installation when you get near walls they came up with an idea of three boards connected to one another, cutting the labor time drastically.

west elm furniture,interior design, furnitures, office interiors So now that they have this product, how about one large flooring square that can be dropped into place? Maybe something like four foot by four foot squares? Possibly, but I could foresee some transportation or handling problems, not to mention trying to cut the stuff. This would really get the job done quickly and easily. Four by four? 16 square feet at a time.!

Why not, there's carpet that can be installed in a similar fashion. On the right are carpet tiles offered by Lowes. Could it be a matter of time we may see something similar with hardwood flooring?
west elm furniture,interior design, furnitures, office interiors


Puzzle Floor is interesting, but how many are clamoring to the idea? If it wasn't a gluedown only type of installation I could see more popularity with the do it yourself market. More on Puzzle Floor.

  • Digg
  • Del.icio.us
  • StumbleUpon
  • Reddit
  • RSS

Install Hardwood Over Old Floors? Yes and No

Here's a question often asked in home improvement forums across the web. Let's say you're faced with a older ceramic tile floor that had seen it's better days. Most contractors will quote a tear out price anywhere from $2.00 to $ 5.00 per square foot. I can see the gulping now! "Yikes, that's almost as much as we had budgeted for a new floor!"

Taking A Look At Installing Over Varied Floor Coverings

Hardwood Over Tiled Floors

Why not install the new hardwood floor over the tile? This way you'll save quite a bit in the long run. Not to mention the fact removing old tile is a very messy job. If it wasn't prepped properly you'll be finding dust for months to come. Thin set dust, the worst part of the project clings to everything including walls and ceilings.

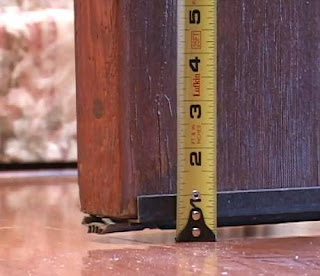
One important tip to consider here before it's too late is what the new floor will look like with door entries (photo right). Best to be prepared ahead of time if the door won't close without being caught on the new floor.

For wood type doors solutions are more simple than metal if this applies to you. They can be trimmed at the bottom allowing for the new floor height. However a new threshold will have to be installed, bringing the height back in line with the door and new door sweep.

Hardwood Over Carpet?

Hey, if I can install hardwood over tile why not over carpeting? Sorry folks, it's gotta go. Carpeting and the carpet pad will not work with any hardwood floor including floating. Reasons being it has too much give for a floating floor, and fasteners will not hold effectively for naildown type floors.

New Hardwood Over Old

With naildown type floors as long as the existing floor underneath is fastened properly, installing a new over it will work. However certain precautions should be taken to insure a successful job. First with nail or stapled floors it's advisable to install the new the opposite direction of the old. Reasons being the new will expand and contract in the same manner as the old. In other words if you had gapping with the old you will also get it with the new.

By installing opposite the expansion and contraction properties will not be pulling the underlying floor with it. If you're dead set on the same direction the only options are either installing minimum 3/8" plywood over the old or removing the existing floor.

Any type of floating floor systems that are not attached to the existing floor do not require any changes. Simply install any direction. Though we don't have enough experience with installing new gluedown floors over old, extra preparations should be taken into account for a successful bonding of new wood to old. Steps such as removing any finish on the older floor by way of sanding the surface to create a rough appearance.

Hardwood Floors Over Vinyl Floors?

For roll or sheet vinyl any floating or nail/staple floor will work successfully, with a possible exception of engineered floors that use a shorter thinner gauged staple. Multiple layers of vinyl may inhibit a successful installation. Floating floors also fall into this category but any direct glue down floors should be addressed differently. For actual vinyl composition tiles the only suggested installation type would be a floating floor.

  • Digg
  • Del.icio.us
  • StumbleUpon
  • Reddit
  • RSS

Install Hardwood Over Old Floors? Yes and No

Here's a question often asked in home improvement forums across the web. Let's say you're faced with a older ceramic tile floor that had seen it's better days. Most contractors will quote a tear out price anywhere from $2.00 to $ 5.00 per square foot. I can see the gulping now! "Yikes, that's almost as much as we had budgeted for a new floor!"

Taking A Look At Installing Over Varied Floor Coverings

Hardwood Over Tiled Floorswest elm furniture,interior design, furnitures, office interiors

Why not install the new hardwood floor over the tile? This way you'll save quite a bit in the long run. Not to mention the fact removing old tile is a very messy job. If it wasn't prepped properly you'll be finding dust for months to come. Thin set dust, the worst part of the project clings to everything including walls and ceilings.

One important tip to consider here before it's too late is what the new floor will look like with door entries (photo right). Best to be prepared ahead of time if the door won't close without being caught on the new floor.

For wood type doors solutions are more simple than metal if this applies to you. They can be trimmed at the bottom allowing for the new floor height. However a new threshold will have to be installed, bringing the height back in line with the door and new door sweep.

Hardwood Over Carpet?

Hey, if I can install hardwood over tile why not over carpeting? Sorry folks, it's gotta go. Carpeting and the carpet pad will not work with any hardwood floor including floating. Reasons being it has too much give for a floating floor, and fasteners will not hold effectively for naildown type floors.

New Hardwood Over Old

With naildown type floors as long as the existing floor underneath is fastened properly, installing a new over it will work. However certain precautions should be taken to insure a successful job. First with nail or stapled floors it's advisable to install the new the opposite direction of the old. Reasons being the new will expand and contract in the same manner as the old. In other words if you had gapping with the old you will also get it with the new.

By installing opposite the expansion and contraction properties will not be pulling the underlying floor with it. If you're dead set on the same direction the only options are either installing minimum 3/8" plywood over the old or removing the existing floor.

Any type of floating floor systems that are not attached to the existing floor do not require any changes. Simply install any direction. Though we don't have enough experience with installing new gluedown floors over old, extra preparations should be taken into account for a successful bonding of new wood to old. Steps such as removing any finish on the older floor by way of sanding the surface to create a rough appearance.

Hardwood Floors Over Vinyl Floors?

For roll or sheet vinyl any floating or nail/staple floor will work successfully, with a possible exception of engineered floors that use a shorter thinner gauged staple. Multiple layers of vinyl may inhibit a successful installation. Floating floors also fall into this category but any direct glue down floors should be addressed differently. For actual vinyl composition tiles the only suggested installation type would be a floating floor.

  • Digg
  • Del.icio.us
  • StumbleUpon
  • Reddit
  • RSS

Installing Hardwood Against Fireplaces


It's been awhile since I did any articles on actual installation. Browsing through my pictures files, I institute these shots of how to deal with installing against fireplaces or hearths. Many thanks to Stephen Pererra of Top Floor Installation Company in Tucson, Arizona whom I spent a some days with in late January.

He prefers to handle jobs by undercutting the domicile with the ingest of an electric jamb saw armored with a primary parcel tipped cutting blade (below). This allows for the flooring to slide low and eliminates the need for any cut in the area, creating a smooth professional appearance.


The crowning picture was taken years past and has been lopped several times, attractive the real meaning out of how the procedure is done. This can create a dust storm, but I've heard of better methods to keep the dust at a minimum. Perhaps some installers can chime in on how they handle it. Anyway, some final shots of what the procedure looks like afterwards.


If you hit a niche hearth that sits flush with a hardwood story this machine will not work. Check another methods when instalment hardwood floors around niche hearths. And if you should happen to be in the Tucson area, provide Stephen a call. You can find his contact aggregation at the link above.

  • Digg
  • Del.icio.us
  • StumbleUpon
  • Reddit
  • RSS

Installing Hardwood Against Fireplaces

west elm furniture,interior design, furnitures, office interiors
It's been awhile since I did any articles on actual installation. Browsing through my pictures files, I institute these shots of how to deal with installing against fireplaces or hearths. Many thanks to Stephen Pererra of Top Floor Installation Company in Tucson, Arizona whom I spent a some days with in late January.

He prefers to handle jobs by undercutting the domicile with the ingest of an electric jamb saw armored with a primary parcel tipped cutting blade (below). This allows for the flooring to slide low and eliminates the need for any cut in the area, creating a smooth professional appearance.


west elm furniture,interior design, furnitures, office interiors
The crowning picture was taken years past and has been lopped several times, attractive the real meaning out of how the procedure is done. This can create a dust storm, but I've heard of better methods to keep the dust at a minimum. Perhaps some installers can chime in on how they handle it. Anyway, some final shots of what the procedure looks like afterwards.

west elm furniture,interior design, furnitures, office interiors

west elm furniture,interior design, furnitures, office interiors

If you hit a niche hearth that sits flush with a hardwood story this machine will not work. Check another methods when instalment hardwood floors around niche hearths. And if you should happen to be in the Tucson area, provide Stephen a call. You can find his contact aggregation at the link above.

  • Digg
  • Del.icio.us
  • StumbleUpon
  • Reddit
  • RSS

TopOfBlogs My Ping in TotalPing.com iPing-it Add to Feedage RSS Alerts Add To Fwicki Add to Spoken to You
Preview on Feedage: interior-design-minimalis Add to My Yahoo! Add to Google! Add to AOL! Add to MSN
Subscribe in NewsGator Online Add to Netvibes Subscribe in Pakeflakes Subscribe in Bloglines Add to Alesti RSS Reader
Add to Feedage.com Groups Add to Windows Live
Feedage Grade B rated